The Ultimate Guide to Bed Leveling: Avoiding Print Warping and Layer Shifts
Bed leveling is one of the most crucial parts of 3D printing. Imagine trying to paint a canvas that’s not flat—your strokes wouldn’t look great! Similarly, if your print bed isn’t level, your 3D printer will struggle to produce high-quality prints, leading to warping, layer shifts, and poor adhesion. But don’t worry; once you master the art of bed leveling, you’ll see smoother prints, fewer failures, and a whole lot less frustration.


Let’s dive into the world of bed leveling and explore tips and techniques to keep your 3D prints rock solid.
Why Bed Leveling Matters
Leveling your print bed ensures that the nozzle is at an equal distance from the bed across the entire print area. When this isn’t the case, some areas may get “squished” while others barely stick, resulting in poor adhesion and layer shifting. A properly leveled bed allows for uniform layer adhesion, reducing the risk of warping and improving print accuracy.
Pro Tip: Think of leveling as giving your printer a solid foundation. It’s the difference between a wobbly house and one built on stable ground.
1. Manual Bed Leveling: The Ol' Reliable
Manual leveling may sound intimidating, but it’s actually simple and gives you full control. Most printers include leveling knobs that allow you to adjust each corner individually. Here’s how to do it:
Home the Printer: Start by homing your printer to reset the nozzle position.
Use the Paper Method: Place a sheet of standard printer paper under the nozzle. Adjust the knobs until you feel slight resistance as you slide the paper back and forth.
Repeat on Each Corner: Move the nozzle to each corner and repeat the paper test. Go around a few times, as adjustments in one corner can affect the others.
Fun Fact: Don’t be surprised if you end up with a small paper collection - this is an essential tool for many 3D printer enthusiasts!
2. Automatic Bed Leveling: The High-Tech Solution
Automatic Bed Leveling (ABL) sensors can be a lifesaver, especially for beginners. With ABL, your printer’s firmware automatically measures the bed’s height in various spots, adjusting in real-time to ensure consistent layer height.
BLTouch or Probes: A popular option, the BLTouch uses a probe to detect height differences.
Inductive Sensors: These sensors detect distance based on magnetic properties, so they’re perfect for metal beds.
Pro Tip: Even with ABL, it’s good to start with a somewhat leveled bed. Think of ABL as a helper, not a replacement for basic leveling.
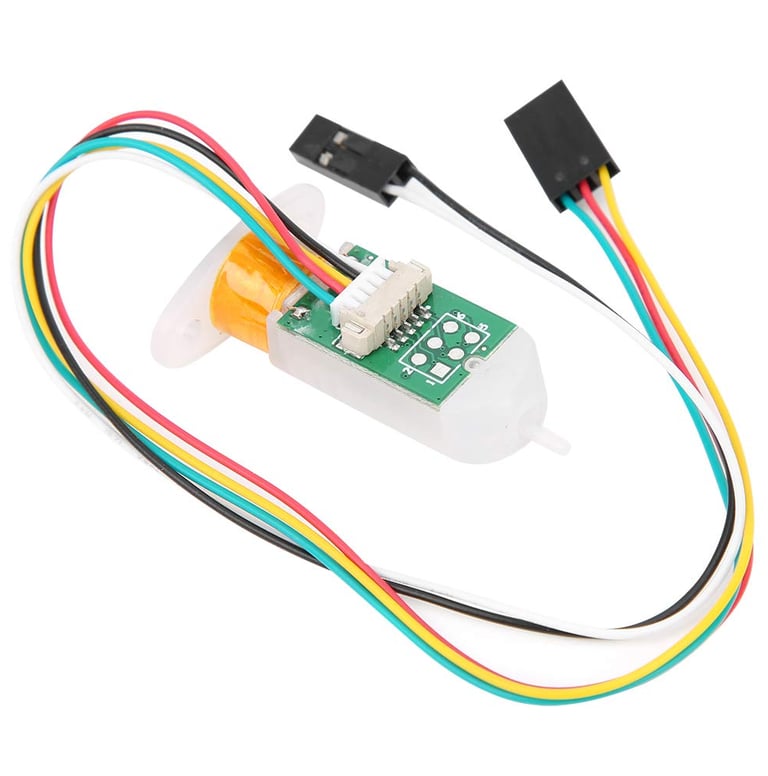
The BLTouch Sensor
is compatible with many FDM printers and offers reliable automatic bed leveling.

3. Z-Offset Tuning: Getting the First Layer Just Right
Even with perfect bed leveling, the first layer might still need a little tweaking. The Z-offset adjusts the distance between the nozzle and the bed, and is particularly useful if your prints are either “squished” or too loose.
Adjust for Adhesion: Lowering the Z-offset slightly will help improve bed adhesion by “pressing” the filament onto the bed, while raising it gives a cleaner surface finish.
Use Your Slicer Software: Most slicers allow you to adjust Z-offset, or you can tweak it through your printer’s settings.
Quick Tip: If you find yourself adjusting Z-offset often, save different offsets for various materials; it’ll save time in the long run.
4. Temperature Tweaks for Better Bed Adhesion
Temperature plays a major role in preventing warping, especially for materials like ABS and PETG. The right bed temperature ensures that the first layer sticks well without curling up.
PLA: Typically, 50-60°C works well.
ABS: A heated bed at around 100°C is essential to prevent warping.
PETG: Try around 70-80°C for optimal adhesion.
Fun Fact: If bed leveling feels frustrating, remember that a heated bed is like a cozy blanket for your print. It keeps things snug and in place.
5. Using Bed Adhesives: Glue Sticks, Hairspray, and More
For those tricky prints that just won’t stay put, bed adhesives can help. Here’s a quick rundown:
Glue Stick: A classic solution, apply a thin layer of glue stick to help with adhesion.
Hairspray: Spritzing a light coat of hairspray can work wonders for PLA and ABS.
Specialty Adhesives: There are also adhesives made just for 3D printing, like Magigoo, that work well for specific materials.
Pro Tip: Make sure to clean your bed between prints to avoid build-up, which can affect leveling and adhesion.


6. Avoiding Warping with Bed Surfaces: PEI, Glass, and Beyond
Different bed surfaces offer unique benefits for adhesion and leveling stability. Here are a few to consider:
PEI Sheet: Great for PLA and ABS, PEI is durable, reusable, and provides good adhesion.
Glass Bed: Known for its smooth finish, glass beds are ideal for models with flat bases, but might require additional adhesives.
Textured Build Plates: Often used for PETG, textured plates grip better but can be trickier to level precisely.
Quick Tip: If you switch bed surfaces often, remember to check and adjust your Z-offset for each one.
7. Leveling Tools: Taking Accuracy Up a Notch
Using tools like digital bed leveling sensors and leveling guides can take your prints to the next level. While optional, they’re helpful if you’re aiming for precision.
Feeler Gauge: More precise than paper, a feeler gauge gives exact measurements for leveling.
Digital Leveling Sensors: Some sensors provide visual or audible feedback to help you fine-tune leveling.
Fun Fact: Bed leveling can feel like science class, but the results are worth it - especially when you’re printing delicate or detailed models!
8. Regular Maintenance: Keeping Things Level Over Time
Over time, wear and tear on components like springs, belts, and bed surfaces can throw off leveling. Make a habit of checking your printer regularly:
Check for Loose Components: Tighten any loose bolts, belts, or bed springs.
Inspect Bed Surfaces for Wear: Worn-out surfaces may need replacing to maintain consistent leveling.
Quick Tip: Adding leveling to your maintenance checklist every few prints will keep you from having to troubleshoot unexpected failures.
In Summary: Bed Leveling, Mastered
Perfecting bed leveling is a process that requires patience and practice, but once you’ve got it down, you’ll notice a huge difference in print quality and reliability. Whether you go manual, automatic, or somewhere in between, mastering bed leveling means fewer failed prints, reduced warping, and consistent results.
And hey, if you ever feel frustrated, just remember—you’re not alone! Every 3D printing enthusiast has faced bed leveling woes. With a bit of persistence, you’ll be leveling like a pro in no time. Happy printing!